Pages

Tuesday, August 9, 2011

Bringing Light to the Dungeon


Last weekend I decided I’d had enough of the creepy laundry room. Something needed to be done. So I figured that with an extra lamp and a piece of furniture to serve as a folding station, my laundry room could be much more enjoyable. Well, things turned out better than expected, and my laundry room project sparked a cleaning mood in both Tyler and me, which made the whole basement a more enjoyable, less cluttered space.

Remember the photos of the dark, dirty, spider-filled laundry area?


I shudder thinking back to the way things were. I can’t believe I ever spent time down there! Yikes. Well, the photos from this project are going to be even more shocking since I didn’t post photos of the first round of improvements (mainly doing something about that awful floor).

Back to the “beautify the laundry room” project of this weekend, I headed down there to take note of what I needed before we headed out to the store. I knew that buying a new piece of furniture to serve as a folding station (aka, countertop) would get expensive, so I brainstormed to think of alternative options (you know, since our basement is filled with junk and there had to be something there that could be repurposed). Lucky for me, we had purchased a shoe cabinet for upstairs that had since been moved downstairs due to redecorating/deciding I didn’t want shoes all over.

The shoe cabinet was currently serving as boot storage, but since it’s July, those have not been needed for quite some time. Tyler really doesn’t have my imagination. He did not look thrilled at the prospect of turning a small, narrow shoe cabinet into a folding station for my laundry room. But I had a vision, and all I needed was a thick piece of plywood.

(Note: Sorry, but I did not take step-by-step pictures, because my camera was at Tyler’s office.)

So we went out and bought a piece of plywood (it was either ½ inch or ¾ inches), which we then centered on the shoe cabinet and nailed in with a nail gun (Tyler’s new toy—it’s great). Of course I didn’t anticipate that the power of the nail gun would create pretty deep holes where the nails went in. I thought I should grab some wood putty and fill them in, but Tyler didn’t feel that was necessary, since he believes this is a temporary solution (haha, too bad I like the end result so much!).

So my next instinct was to cover the whole surface with fabric. And coincidentally, I had some extra fabric lying around from a table cloth I cut up. Also coincidentally, it fit perfectly! So I folded the ends under and used a staple gun to attach the fabric to the bottom of the surface all around. Quick and easy—my kind of project!

Now I have a good amount of room to fold clothes in the no-longer dungeon if I choose, plus we have storage for all of our laundry “accessories” (you know, like dryer sheets, detergent, etc.). So those things don’t have to sit here:


Yes, by “here” I mean all over the place. A nice, organized solution that turned out way better than I ever thought it would. Here are the after photos:

There were a few mishaps with the nail gun, but I am plotting ways to cover up the dangerous nails sticking out, because I'm thinking this thing's a keeper!


Here's a wide shot of the room, with some of those not-so-attractive basement things sneaking into the shot. Soon enough it will all be pretty down there.

And now the sink can actually be used to wash things. The whole sink will be painted as part of my "de-green the basement" project.

Tuesday, August 2, 2011

Birdcage Veils...not as easy as they look!

I love the look of birdcage veils. They’re so vintage-y and cute. And since they’re so small, I figured, “How hard can it be?” It turns out, harder than it looks. And with such a small amount of material, I can’t mess up over and over.

The good news is that the material is cheap. I bought about a yard on Etsy for $4. And the material even came with a little clear comb to attach the veil to. Now, this was my second purchase of veiling on Etsy. I somehow lost the first veiling when I was carting it back and forth between my house and my mom’s. So who knows where that is now, but I hope it turns up so I have more to practice with!

The first time the veiling came, I think I had read one or two tutorials, so I was ready to take a stab at it. (You should know, I am not very patient, and I often start projects thinking they will be super easy, only to find out I need to go back and rethink things.) With that first try, I sewed a side of the veiling to the comb that came with it and checked out my work in the mirror to see how to proceed. I could not figure it out beyond that first side. There was just a ton of veiling (no, of course I didn’t cut it to size first, since I didn’t know what size I wanted it).

After that, I went back to do more research and find tutorials from people who have actually DIY-ed birdcage veils. It turns out there are a ton of tutorials online. But even with all of those resources, it’s hard to figure out how to get the veil to lay right. I should also mention that I ordered my veiling shorter than I wanted it to hang on my face, so I’m using what I learned from those tutorials a little and improvising a lot.

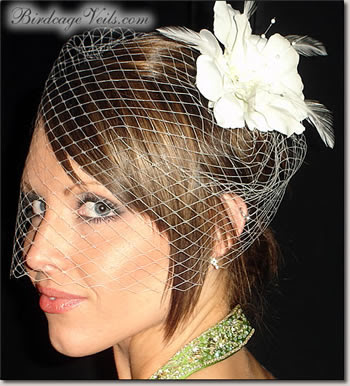
It seems like most people use one comb to sew the veil to, then attach that one comb to their hair. But since I want my veil to cover my eyes, I’m trying to use that one comb on just one side, then attach the other side to bobby pins. What I have so far is interesting. Here's the look I'm going for:

I really like the one side I've completed with the comb, but I’m not crazy about the cockatiel-like height of the veil on top of my head. I have to figure out how to fix that. I keep trying to wrap my head around how I would make the back shorter while keeping the front from being embedded in my face (I want more of a bubble look), but I haven’t figured it out yet.

This is what I view as embedded in the face
This is the cute bubble look I'm going for

I am not giving up hope yet. I am going to yet again do more research and try to figure out how to make this thing work the way I want it to. However, I may end up compromising and figuring out how to make it work the way other people have. Back to the drawing board…

And if all else fails, I may do this:


Wednesday, April 13, 2011

Definitely A Chintzy Project

I’ve been wanting new, more “adult” chairs lately, as I stare at my black dorm-room chairs that don’t match a thing in my house. (Although I kind of have a hodgepodge of furniture, so maybe nothing matches...)

This chair belongs in a dorm room.
But I haven’t found anything I love at a price I can stomach, so I’m stuck with these guys for a while. So, I decided to make the best of things. I bought white spray paint, which I plan to use on those faux-metal legs, and I planned on buying fun-looking blankets to cover the chairs with. I figured I could find blankets with a little texture at an affordable price. The only problem is shopping around here is limited, and I am one of those immediate-gratification people.

This meant I had to think outside the box and look for anything that would work with my “vision.” Oh Target, I love you! I found a table cloth I loved, but at $18 I didn’t really want to get one for each chair (I told you I was chintzy!), so I decided to get one and see when I got home whether I could cut it in half to work for both. Guess what…it worked! Here's a side-by-side comparison of my new, somewhat chic (definitely more chic than it was) chair and the old one that belongs in a dorm room:

                          
It’s not perfect, but it’s a significant improvement. I hand sewed half of the table cloth into the top of the chair, and I will figure out something to do with the bottom. I recently read this post about painting fabric, but I’m not sure how well trying to paint a light color onto this black chair would work. Here's shot of the uncovered back of the chair...not so pretty:


And since I can't end my post with a not-so-pretty picture, here's shot of the beautiful bush in front of my house that has bloomed, thanks to spring finally being here! Ahhh, I love it!


Monday, March 21, 2011

A Beautiful (and Easy) Bouquet


This will probably be my favorite thing for my wedding (it is so far). I finally got up the nerve to try making my cotton bouquet. I had to really think about how to do it, because the cotton stems weren’t very long, and bunching them together would make a very small bouquet. So I decided my best bet was to stick each cotton boll into a large styrofoam ball, then somehow attach that to a styrofoam cone to use as the base. Here are the materials I gathered to begin this project:


By the way, the roll of burlap I found at Michael’s is my favorite part. I love it! So first I tried to attach the ball to the base of the bouquet by sticking a needle through the end of the base and pressing it into the ball. Not so sturdy. I underestimated the weight of this thing. So I used a glue gun to try to glue them together…


That seemed to work at first…


…but when I tried to stick in the first cotton boll, I realized I needed something sturdier.


As you can see, each cotton boll is surprisingly large compared to the styrofoam ball I used, and when a bunch are stuck in that thing, it’s actually pretty heavy compared to what I thought it would be. In order to try to stabilize the styrofoam setup a bit, I also tried squeezing all-purpose glue between the two pieces, but that didn’t do much either.


After that I decided I better put connecting the two pieces on hold and think about how to really stabilize it (I may try wooden skewers after reading this post), and in the meantime I kept attaching more and more cotton bolls to my styrofoam ball. It was at this point, about halfway through the project, that my brother suggested I draw a face on it (it does look like a woman in curlers):


But once I got past the funny-looking stage, it turned out amazing! I’m so proud/excited about this thing…that is, if I can figure out how to attach the base. Here are a couple of shots of the finished top of the bouquet:


After struggling with that base, I gave up and balanced it on a similar-sized glass. That worked out quite well. Obviously there are a few spots where styrofoam is trying to peek through, so I will need to stick little pieces of cotton in those places, but for the most part I am pleased with it. I didn’t think mine would come close to the awesome bouquet that inspired it, but I think it’s going to get there.

Since I was so excited about that burlap purchase, I had to try it out on the detached base:


I tried wrapping it a few different ways, and I was happy with all of them. I don’t think you can really go wrong trying to get a rustic look with burlap. This is what I settled on for the time being, because I was able to tuck the end in to keep it in place.

So that’s my bouquet. Yay! One more thing to check off the wedding list.

And speaking of checking things off our list, we started removing the awful green color from our basement! It looks like a very small section, but really we tackled the hardest part first. That brick was tricky to prime. It took two of us, one roller, two brushes, loud music, and a few hours to get through this part, but I have a feeling it’s all downhill from here. Have a look-see (basement photoshoot!):


That brass thing attached to the post is all that was left of the shelves that were hung across the posts in front of the brick by the time I remembered I should be taking pictures of the process. You can use your imagination to picture the beauty that the shelves added (ha!).


Finding this can in all the ash from the upstairs fireplace was very exciting for Tyler...until he realized it was empty.

I think this pictures captures the horrible green color the best.


Still some green showing through after the first coat of primer...


But the second coat really helped.

This side-by-side really shows the contrast between the two colors.

And you can see the huge difference between the posts.

Ahhh, it's so much nicer!

That brick can’t scare us! We’ll be at it again soon, painting the brick with a bright “pop” color. We want to make that basement as cheery as possible. The posts, though, will stay white. And all that white in the basement is making us so happy after the dark green that we had. It’s amazing how it opens the space up.

Sunday, March 13, 2011

You Are Cordially Invited...


Yikes, it has been too long since my last post. Time flies when you’re…not working on your basement. It’s true, the basement renovation has been at a standstill (life just keeps getting in the way!). But the good news is we plan to work on it soon, so there may be some small but important improvements this week.

While not much has been going on with the basement, preparations for the wedding have still been coming along. And today we are able to cross one more item off our to-do list. We bought an invitation kit!


My plan was to either print the invitations ourselves or find a place to do them for cheap, then buy awesome envelopes and replicate the process I saw here (seriously, that girl is amazingly creative!). But I knew that would be a lot of work, and the envelopes I found would cost me $50 alone. And since this invitation kit that includes everything was marked down from $40 to $20 at Target for 50 invitations (good eye, Future Mother-in-Law), I figured it was a better way to go. Since we will need closer to 100 invitations, our total cost (minus postage) was around $40. Not too shabby.


I had already “designed” (I use the term loosely) our wedding invitations, so I just had to adjust the size (and color) a bit to fit the sheets provided in the kit. Quick and easy. Here’s the result (it printed a bit crooked, so it’s clearly just a sample):


Tyler really wanted to embrace the barn theme and make our invitations look like old “Wanted” posters. Since he hasn’t had many specific requests for the wedding, I figured I better give him this one. Plus, we want the invitations to set a fun, somewhat casual theme for the wedding.

Friday, February 25, 2011

A Home for My Cupcakes

I'm not a big cake person. (I'll pause here so you can gasp in shock.) I don't know what it is, but cake has never been my favorite dessert. I LOVE anything chocolate, and I have a mean sweet tooth, but cake just never did it for me. So I decided to have cupcakes instead of cake at my wedding. I'm even going to have a giant cupcake so that we can have a cupcake-cutting ceremony--and because the idea of a giant cupcake just makes me smile.

Check out this beautilicious giant wedding cupcake I found here.

On my hunt for the best "cupcake dealer" out there, I came to the realization that the markup on dessert for weddings is ridiculous. I mean, $4 for each cupcake? (Yes, I did come across a place that charged that.) At 200 guests--that's going to almost double the cost for food! Upon this discovery, I decided we should not have cupcakes at our wedding--one giant cupcake, yes; but cupcakes for everyone, no.

I was okay with this decision. Then one day at a bridal expo in town, we passed a cake vendor's table, and they had a nice spread of different flavored pieces of cake and a plethora of frosting choices to sample. I would have walked on by, but my future mother-in-law was on the hunt for a good cupcake vendor for her own daughter's wedding (my future sister-in-law is getting married a couple months after us...let the parties begin!).

So we stopped to take a look at this vendor's table. Tyler took this opportunity to grab a sample of chocolate cake with coffee frosting. It was love at first bite for him. And since we had to test out some of their other flavors, I tried a piece of white (is that a flavor?) cake with champagne frosting. Wow. These people don't mess around! The best part? They are reasonably priced! Needless to say, I left that bridal expo excited like a kid on Christmas Eve. I will have my cupcakes after all--and they'll be delicious!

Okay, this whole back story leads me to my purchase this weekend at World Market (love that place). This adorable cupcake stand was on sale for $9.99--and I had to buy something.


It won't hold all of the cupcakes I plan to have, but it will add some serious adorableness to my dessert table.

Thursday, February 24, 2011

From Floors to Walls

Exciting things are happening in our basement! I am starting to see the vision for the finished project. I had something in my mind before, but now it’s really starting to set in. AJ has been kind enough to spend the past couple of nights at our house starting to frame the walls with Tyler. (Since he is just finishing putting up walls in his own basement, he’s the perfect guy for the job.)


I threw this picture in to show a little bit of the floor. It'll look a lot better with some walls up.
Our house has been pretty noisy these past few nights with nailing, sawing, and shouts of frustration. It turns out the only thing that is level in our basement is the wall, thanks to the careful work of those guys. But despite the challenging space, it’s coming together nicely—and quickly! The guys have framed one of about six walls, and they accomplished that in just a few nights after working their usual 7-5 (yikes!). They plan to be at it full time this weekend, so we may get a good chunk of the basement framed. Yay!

Naturally while they’re busy putting together the skeleton, I’m moving on to the fun stuff. I’m already jumping ahead to how I want to decorate the walls, where the TV and furniture will be, etc. (I have this problem with wanting immediate gratification—guess I’ll just have to wait this time though.)

Actually, one of the things that kind of made me jump ahead to the wall décor was the fact that our friend Michelle’s mother-in-law was switching her laminate floors out for carpet, and the floors are still in good shape (You’re probably wondering what floors have to do with wall décor, but bear with me). Michelle is eco-friendly and hates to see perfectly good material go to waste, so she let me know about the treasure that would be thrown out. She sent these pictures via text to show me what it looked like put together:


Beautiful, right? Of course I wanted that material! So I talked to Tyler about where we could put it. We already painted the concrete floors in our basement, and we didn’t want the cost of paint to go to waste, so that was a no go. Our living room upstairs is currently carpeted (white), and our pups have broken it in a bit, so I thought maybe up there, but the rest of the floors throughout the house are darker wood, which would make for an odd combination.

So I reluctantly turned down the offer for the free flooring. But then I realized that I’ve seen flooring put on walls before and I think it looks really cool and modern! (I want to make the distinction here between wood paneling and wood flooring on the walls—I am talking about laying the flooring horizontal, which makes a huge difference, and it will be used sparingly.) So I decided we should take it after all. Let me tell you, it is already a battle trying to get Tyler to see my vision. He hasn’t said he doesn’t like it or that he won’t try it, but he’s sure not as excited about it as I am. I even showed him this clip to try to sell him on it (hey, if HGTV does it…):


But he’s still not sold. I did draw him a little sketch of my vision too, but nothing. His response after seeing the video was, “It’s still flooring on the wall.” He has a point, but I think it will look great. It won’t hurt to try it!

Monday, February 21, 2011

Patching and Purchasing

This weekend we prepped the basement floor to paint the concrete (photos of that to come just as soon as the paint dries). My goodness, there were a lot of holes and cracks! Here are some photos of the patch work. Attractive, isn’t it?


And we had to add one more crack to the floor before painting. Tyler carved out a deep trail to run tubing to the drain that sits in the middle of the future guest bedroom so that we could remove the PVC pipe that currently does the job. (Side note: I actually have no idea what drains there, so I don’t know what “the job” is.)


So our first exciting purchase of the weekend was an angle grinder to carve out the trail to the drain. Wait, did I say “our”? Oops, only one of us was truly excited about this purchase. I’ll let you figure out who. (Hint: This person also said he/she would like a new set of tools as a wedding present...it’s the little thrills in life.) Here’s a reenactment of Tyler using his new toy.


Sorry there’s no action shot of him grinding that concrete. But that leads me to our second exciting purchase. And this one really was exciting for both of us. Sunday we bought a Canon EOS Rebel T2i (my gosh, that is a mouthful)! It’s our first DSLR, so it is going to take us a while to get the hang of it, but I’m excited to see what kind of pictures we can take when we do. For obvious reasons, there is no photo of the camera, but I did break it in taking photos of our babies, Molson and Slagathor. (I can't promise anything, but I will try to keep the puppy photoshoots to a minimum.)


Fun fact: Both of our dogs have underbites--we did not plan it that way.
Molson has an addiction to tennis balls and gets a little crazy over them. This is her jumping to grab the ball out of Tyler's hands 

And chewing on a bone.
This is Slagathor's usual pose. Her favorite things in life are food, sleep, and cuddles.